How to Show Color in Photos Like the Human Eye with HDR
Sat, Oct 19, 2019
The human eye is amazingly adaptable in ways that cameras cannot replicate. As you scan a scene in real life, your eye constantly adjusts to the level of light in the area of you're viewing. However, when you take a photo, the camera captures light at only one level, typically the area of focus on the image. That often leaves other areas, like shadows, very dark and views through a window blindingly light. The result is photos that don't quite look they way they appear in real life.
For instance, in a photo, areas in the shadow of a tree are so dark you cannot make out any details. Yet when you look at the scene in real life, your eye easily picks out details. A room may have amazing views of a lake, but the picture, with washed out areas, just can't seem to capture its beauty.
Fortunately, there are photographic and processing tricks we can use to create photos that look closer to what we actually see. One of these is high dynamic range photography or HDR.
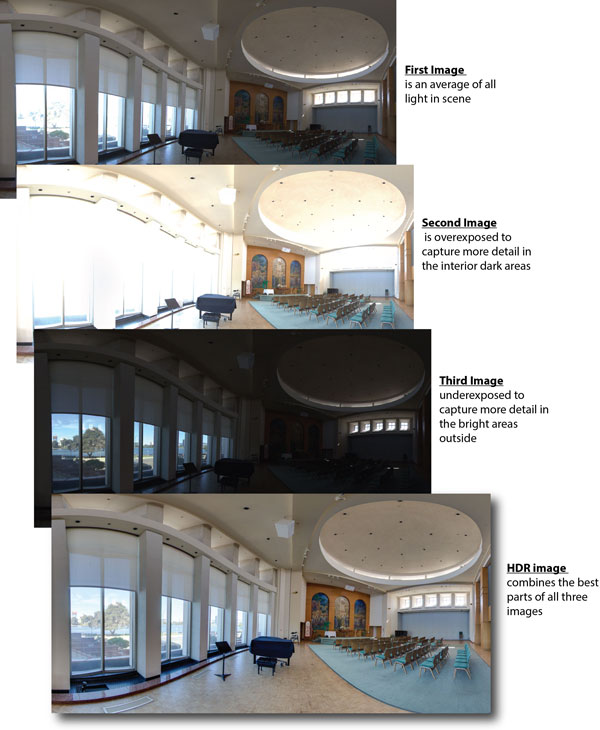
To create an HDR image, a photographer will first take three photos of the same scene. Each photo will have a slightly different exposure time. One image will be a normal exposure, basically an average of the light level in the scene. The next photo will be a longer exposure to let in extra light to reveal details in darker areas. The final image will be a quick exposure so bright areas dont get washed out by letting in too much light. HDR photography works great for static scenes but if anything is moving, they turn up as ghosts in the final image.
Various lighting photo shots that, when combined, comprise an HDR image
The photographer then processes the photos using software that merges all three images, taking the best parts of each to form a single image, an HDR image. Even with these techniques, the eye is still an incredibly complex machine and cameras have a long way to go to match what the eye can see.