How to Draw Your Own Floor Plans
Wed, Oct 02, 2019
Drawing floor plans can seem like a daunting task. But the techniques surveyors, engineers and architects use make drafting accurate floor plans relatively easy. This article covers drawing a simple floor plan for a single room. Once you have mastered creating individual floor plans, you can tackle more complex tasks such as creating plans of multiple, interconnected rooms and full home or building plans.
Start with the tools for creating floor plans. Typically, I use the following:
- Clip board, paper and pencil
- Laser Measure
- Tape Measure
- Ruler
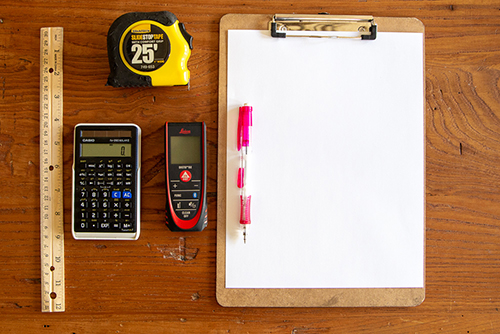
I recommend getting a laser measure, which costs about $50. Though tape measures are cheaper, using them will lengthen the time needed to measure the space. Additionally, with tape measures, you'll need two people to do the work. They are difficult to use around furniture, and most are limited to only 10 - 25 feet, which presents problems in larger spaces.
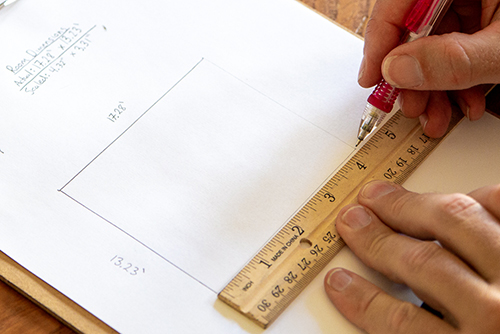
Since US rulers are in inches and further divided into 1/16 (sixteenths of an inch), I use a scale of one inch on the ruler equals four feet in real life (1" = 4'). Using a standard 8.5" x 11" sheet of paper means that you can fit a room up to 34 feet by 44 feet. If you are using one inch equals eight feet (1" = 8'), the areas you can measure is doubled to 68 by 88 feet. You'll want to pick a scale that allows you to fit the room on paper, but not so small that you cannot draw any details.
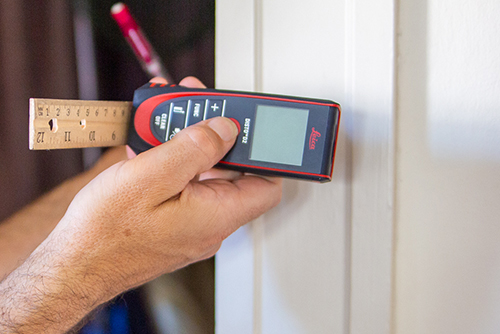
Once you have a scale, convert your measurements into lines on a sheet of paper. Many laser measurers take measurements in tenths and hundreds of a foot. So, you'll need to convert that into a distance that you can draw using a ruler broken down into increments of 1/16 of an inch.
How long do you draw a 11.45 foot measurement on your floor plan when the scale is 1" = 4'? 1. Divide the measurement by your scale (11.45 / 4 = 2.8625 inches) 2. Multiply the decimal portion (2.8625) by 16 to convert the decimal into sixteenths of an inch (0.8625 x 16 = 13.8) round to 14.
11.45 feet = 2 and 14/16 inches on floor plan
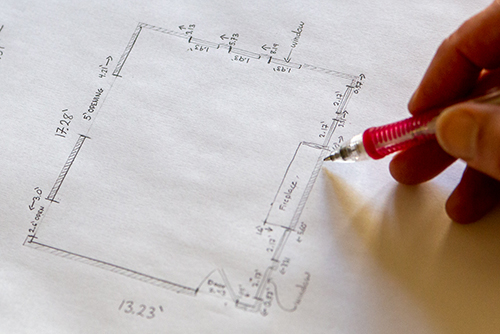
Your first measurements should be the length and width of the room. Use those dimensions to draw the light outline of a box where all your other room details will fit. In this example, my room is 17.28 feet by 13.23 feet. When I convert those dimensions to feet, using a scale of 1 inch equals 4 feet, I will draw a rectangle of 4 5/16 inches by 3 5/16 inches on my paper.
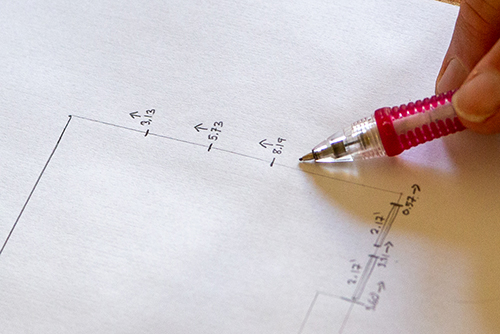
Measuring windows and door can be tricky. A common way of measuring, from window to window to window, frequently results in unexpected errors and inaccuracies. If there's an error in the first measurement, then all following measurements will also be off. Any additional errors are then compounded. By the time you get to the last window the errors can be very noticeable.
A simple and easy way to avoid these errors, make measuring go faster and make your drawings easier to read is to measure all windows and doors from the same reference point, usually a wall. I usually measure the distance from one edge of a window or door to a wall. Older buildings often have molding around windows and doors which makes it difficult or impossible to measure directly from their edges. If that's the case, place a ruler on the edge to extend clear of the molding to get an obstructed shot to the wall. For each item I draw the edge then an arrow pointing to the wall I measured to along with the distance. Once I have marked the locations of all windows and doors, I measure the size of the window or doors.
Remember in school how your teacher reminded you to check your work before handing it in, the same goes for drawing floor plans. Always double check your measurements. It will take only a few minutes, but chances are you will find a few mistakes. Those mistakes, if left uncorrected can cause delays, increased costs of a project, etc. It's worth a little extra time to catch them now.
Once you have everything located on your plan, it's time to finish it up. Give your drawn wall lines thickness. Usually you don't have to be super accurate with wall thickness unless you are joining multiple rooms. A good rule of thumb is to use 6 inches. If you use 1" = 4' that works out to be 2/16 of an inch thick on your floor plan. Draw lightly, you can fill in with heavier, darker lines when you are finished.
Draw window openings and door swings. On your floor plan draw the direction the doors open. Once all your details are sketched in your floor plan darken the lines and shade in the walls to make a professional looking floor plan that you are now ready to use.
Equipment
Start with the tools for creating floor plans. Typically, I use the following:
- Clip board, paper and pencil
- Laser Measure
- Tape Measure
- Ruler
I recommend getting a laser measure, which costs about $50. Though tape measures are cheaper, using them will lengthen the time needed to measure the space. Additionally, with tape measures, you'll need two people to do the work. They are difficult to use around furniture, and most are limited to only 10 - 25 feet, which presents problems in larger spaces.
Pick a Scale
Since US rulers are in inches and further divided into 1/16 (sixteenths of an inch), I use a scale of one inch on the ruler equals four feet in real life (1" = 4'). Using a standard 8.5" x 11" sheet of paper means that you can fit a room up to 34 feet by 44 feet. If you are using one inch equals eight feet (1" = 8'), the areas you can measure is doubled to 68 by 88 feet. You'll want to pick a scale that allows you to fit the room on paper, but not so small that you cannot draw any details.
Once you have a scale, convert your measurements into lines on a sheet of paper. Many laser measurers take measurements in tenths and hundreds of a foot. So, you'll need to convert that into a distance that you can draw using a ruler broken down into increments of 1/16 of an inch.
Scaling measurements on your floor plan
How long do you draw a 11.45 foot measurement on your floor plan when the scale is 1" = 4'? 1. Divide the measurement by your scale (11.45 / 4 = 2.8625 inches) 2. Multiply the decimal portion (2.8625) by 16 to convert the decimal into sixteenths of an inch (0.8625 x 16 = 13.8) round to 14.
11.45 feet = 2 and 14/16 inches on floor plan
Take Main Dimensions of Room
Your first measurements should be the length and width of the room. Use those dimensions to draw the light outline of a box where all your other room details will fit. In this example, my room is 17.28 feet by 13.23 feet. When I convert those dimensions to feet, using a scale of 1 inch equals 4 feet, I will draw a rectangle of 4 5/16 inches by 3 5/16 inches on my paper.
Measure Windows and Doors
Measuring windows and door can be tricky. A common way of measuring, from window to window to window, frequently results in unexpected errors and inaccuracies. If there's an error in the first measurement, then all following measurements will also be off. Any additional errors are then compounded. By the time you get to the last window the errors can be very noticeable.
A simple and easy way to avoid these errors, make measuring go faster and make your drawings easier to read is to measure all windows and doors from the same reference point, usually a wall. I usually measure the distance from one edge of a window or door to a wall. Older buildings often have molding around windows and doors which makes it difficult or impossible to measure directly from their edges. If that's the case, place a ruler on the edge to extend clear of the molding to get an obstructed shot to the wall. For each item I draw the edge then an arrow pointing to the wall I measured to along with the distance. Once I have marked the locations of all windows and doors, I measure the size of the window or doors.
Double Check Your Measurements
Remember in school how your teacher reminded you to check your work before handing it in, the same goes for drawing floor plans. Always double check your measurements. It will take only a few minutes, but chances are you will find a few mistakes. Those mistakes, if left uncorrected can cause delays, increased costs of a project, etc. It's worth a little extra time to catch them now.
Finishing your Floor Plan
Once you have everything located on your plan, it's time to finish it up. Give your drawn wall lines thickness. Usually you don't have to be super accurate with wall thickness unless you are joining multiple rooms. A good rule of thumb is to use 6 inches. If you use 1" = 4' that works out to be 2/16 of an inch thick on your floor plan. Draw lightly, you can fill in with heavier, darker lines when you are finished.
Draw window openings and door swings. On your floor plan draw the direction the doors open. Once all your details are sketched in your floor plan darken the lines and shade in the walls to make a professional looking floor plan that you are now ready to use.